Application Development
Note
In this document, we’ll assume your application directory is
<home>/app, and that its build directory is
<home>/app/build.
(These terms are defined in the following Overview.)
On Linux/macOS, <home> is equivalent to ~, whereas on Windows it’s
%userprofile%.
Overview
Zephyr’s build system is based on CMake.
The build system is application-centric, and requires Zephyr-based applications to initiate building the kernel source tree. The application build controls the configuration and build process of both the application and Zephyr itself, compiling them into a single binary.
Zephyr’s base directory hosts Zephyr’s own source code, its kernel configuration options, and its build definitions.
The files in the application directory link Zephyr with the application. This directory contains all application-specific files, such as configuration options and source code.
An application in its simplest form has the following contents:
<home>/app
├── CMakeLists.txt
├── prj.conf
└── src
    └── main.c
These contents are:
CMakeLists.txt: This file tells the build system where to find the other application files, and links the application directory with Zephyr’s CMake build system. This link provides features supported by Zephyr’s build system, such as board-specific kernel configuration files, the ability to run and debug compiled binaries on real or emulated hardware, and more.
Kernel configuration files: An application typically provides a configuration file (usually called
prj.conf) that specifies application-specific values for one or more kernel configuration options. These application settings are merged with board-specific settings to produce a kernel configuration.The Kconfig Configuration section below goes over application configuration in detail.
Application source code files: An application typically provides one or more application-specific files, written in C or assembly language. These files are usually located in a sub-directory called
src.
Once an application has been defined, you can use CMake to create project files for building it from a directory where you want to host these files. This is known as the build directory. Application build artifacts are always generated in a build directory; Zephyr does not support “in-tree” builds.
Important
You must create a build directory yourself, and call cmake from
there. The Zephyr build system does not create build directories for you.
The following sections describe how to create, build, and run Zephyr applications, followed by more detailed reference material.
Source Tree Structure
Understanding the Zephyr source tree can be helpful in locating the code associated with a particular Zephyr feature.
At the top of the tree there are several files that are of importance:
CMakeLists.txt- The top-level file for the CMake build system, containing a lot of the logic required to build Zephyr.
Kconfig- The top-level Kconfig file, which refers to the file
Kconfig.zephyralso found at the top-level directory. west.yml- The West (Zephyr’s meta-tool) manifest, listing the external repositories managed by the west command-line tool.
The Zephyr source tree also contains the following top-level directories, each of which may have one or more additional levels of subdirectories which are not described here.
archArchitecture-specific kernel and system-on-chip (SoC) code. Each supported architecture (for example, x86 and ARM) has its own subdirectory, which contains additional subdirectories for the following areas:
- architecture-specific kernel source files
- architecture-specific kernel include files for private APIs
soc- SoC related code and configuration files.
boards- Board related code and configuration files.
doc- Zephyr technical documentation source files and tools used to generate the https://docs.zephyrproject.org web content.
drivers- Device driver code.
dts- Device tree source (.dts) files used to describe non-discoverable board-specific hardware details previously hard coded in the OS source code.
ext- Externally created code that has been integrated into Zephyr from other sources and that must live inside the zephyr repository unlike external projects
include- Include files for all public APIs, except those defined under
lib. kernel- Architecture-independent kernel code.
lib- Library code, including the minimal standard C library.
misc- Miscellaneous code that doesn’t belong to any of the other top-level directories.
samples- Sample applications that demonstrate the use of Zephyr features.
scripts- Various programs and other files used to build and test Zephyr applications.
cmake- Additional build scripts needed to build Zephyr.
subsysSubsystems of Zephyr, including:
- USB device stack code.
- Networking code, including the Bluetooth stack and networking stacks.
- File system code.
- Bluetooth host and controller
tests- Test code and benchmarks for Zephyr features.
Creating an Application
Follow these steps to create a new application directory. (Refer to Samples and Demos for existing applications provided as part of Zephyr.)
Create an application directory on your workstation computer, outside of the Zephyr base directory. Usually you’ll want to create it somewhere under your user’s home directory.
For example, in a Unix shell or Windows
cmd.exeprompt, navigate to where you want to create your application, then enter:mkdir appWarning
Building Zephyr or creating an application in a directory with spaces anywhere on the path is not supported. So the Windows path
C:\Users\YourName\appwill work, butC:\Users\Your Name\appwill not.It’s recommended to place all application source code in a subdirectory named
src. This makes it easier to distinguish between project files and sources.Continuing the previous example, enter:
cd app
mkdir src
Place your application source code in the
srcsub-directory. For this example, we’ll assume you created a file namedsrc/main.c.Create a file named
CMakeLists.txtin theappdirectory with the following contents:# Boilerplate code, which pulls in the Zephyr build system. cmake_minimum_required(VERSION 3.13.1) include($ENV{ZEPHYR_BASE}/cmake/app/boilerplate.cmake NO_POLICY_SCOPE) project(my_zephyr_app) # Add your source file to the "app" target. This must come after # the boilerplate code, which defines the target. target_sources(app PRIVATE src/main.c)
The boilerplate code sets the minimum CMake version and pulls in the Zephyr build system, which creates a CMake target named
app. Adding sources to this target is how you include them in the build.Note
cmake_minimum_required()is also invoked fromboilerplate.cmake. The most recent of the two versions will be enforced by CMake.Set any Kconfig values needed by your application. Zephyr uses the same Kconfig system as the Linux kernel, but with its own database of configuration options.
For example, create a file named
prj.confin theappdirectory, and enable or disable Kconfig features as needed. You can use existing Samples and Demos to get started with Kconfig variables you are interested in. See Kconfig Configuration for more details, and Configuration Options for a complete list of available options.Optionally, you can also configure any Device Tree overlays needed by your application. Zephyr uses the same Device Tree system as the Linux kernel, but with its own definitions.
This is usually not necessary; see Device Tree Overlays below for details.
Important Build System Variables
You can control the Zephyr build system using many variables. This section describes the most important ones that every Zephyr developer should know about.
Note
The variables BOARD, CONF_FILE, and DTC_OVERLAY_FILE can be supplied to the build system in 3 ways (in order of precedence):
- As a parameter to the
cmakeinvocation via the-Dcommand-line switch - As an environment variables (
exporton Linux/macOS andseton Windows) - As a
set(<VARIABLE> <VALUE>)statement in yourCMakeLists.txt
- ZEPHYR_BASE: Sets the path to the directory containing Zephyr,
which is needed by the build system’s boilerplate file. This is an
environment variable set by the
zephyr-env.shscript on Linux/macOS orzephyr-env.cmdon Windows, as you learned when getting started with Zephyr in Build and Run an Application. You can also set ZEPHYR_BASE explicitly, but then you won’t get the other features provided by those scripts. - BOARD: Selects the board that the application’s build will use for the default configuration. See Supported Boards for built-in boards, and Board Porting Guide for information on adding board support.
- CONF_FILE: Indicates the name of one or more configuration fragment files. Multiple filenames can be separated with either spaces or semicolons. Each file includes Kconfig configuration values that override the default configuration values.
- DTC_OVERLAY_FILE: Indicates the name of one or more Device Tree overlay files. Multiple filenames can be separated with either spaces or semicolons. Each file includes Device Tree values that override the default DT values.
- ZEPHYR_MODULES: A CMake list containing absolute paths of additional directories with source code, Kconfig, etc. that should be used in the application build. See Modules (External projects) below for details.
Build an Application
The Zephyr build system compiles and links all components of an application into a single application image that can be run on simulated hardware or real hardware.
As described in A Brief Note on the Zephyr Build System, on Linux and macOS you can choose
between the make and ninja generators, whereas on Windows you need to use
ninja. For simplicity we will use ninja throughout this guide.
Basics
Navigate to the application directory
<home>/app.Enter the following commands to build the application’s
zephyr.elfimage for the board specified in the command-line parameters:# On Linux/macOS mkdir build && cd build # On Windows mkdir build & cd build # Use cmake to configure a Ninja-based build system: cmake -GNinja -DBOARD=<board> .. # Now run ninja on the generated build system: ninja
If desired, you can build the application using the configuration settings specified in an alternate
.conffile using theCONF_FILEparameter. These settings will override the settings in the application’s.configfile or its default.conffile. For example:cmake -GNinja -DBOARD=<board> -DCONF_FILE=prj.alternate.conf .. ninja
As described in the previous section, you can instead choose to permanently set the board and configuration settings by either exporting BOARD and CONF_FILE environment variables or by setting their values in your
CMakeLists.txtusingset()statements.
Build Directory Contents
When using the Ninja generator a build directory looks like this:
<home>/app/build
├── build.ninja
├── CMakeCache.txt
├── CMakeFiles
├── cmake_install.cmake
├── rules.ninja
└── zephyr
The most notable files in the build directory are:
build.ninja, which can be invoked to build the application.- A
zephyrdirectory, which is the working directory of the generated build system, and where most generated files are created and stored.
After running ninja, the following build output files will be written to
the zephyr sub-directory of the build directory. (This is not the
Zephyr base directory, which contains the Zephyr source code etc. and is
described above.)
.config, which contains the configuration settings used to build the application.Note
The previous version of
.configis saved to.config.oldwhenever the configuration is updated. This is for convenience, as comparing the old and new versions can be handy.Various object files (
.ofiles and.afiles) containing compiled kernel and application code.zephyr.elf, which contains the final combined application and kernel binary. Other binary output formats, such as.hexand.bin, are also supported.
Rebuilding an Application
Application development is usually fastest when changes are continually tested. Frequently rebuilding your application makes debugging less painful as the application becomes more complex. It’s usually a good idea to rebuild and test after any major changes to the application’s source files, CMakeLists.txt files, or configuration settings.
Important
The Zephyr build system rebuilds only the parts of the application image potentially affected by the changes. Consequently, rebuilding an application is often significantly faster than building it the first time.
Sometimes the build system doesn’t rebuild the application correctly because it fails to recompile one or more necessary files. You can force the build system to rebuild the entire application from scratch with the following procedure:
Open a terminal console on your host computer, and navigate to the build directory
<home>/app/build.Enter the following command to delete the application’s generated files, except for the
.configfile that contains the application’s current configuration information.ninja cleanAlternatively, enter the following command to delete all generated files, including the
.configfiles that contain the application’s current configuration information for those board types.ninja pristineRebuild the application normally following the steps specified in Build an Application above.
Run an Application
An application image can be run on a real board or emulated hardware.
Running on a Board
Most boards supported by Zephyr let you flash a compiled binary using
the CMake flash target to copy the binary to the board and run it.
Follow these instructions to flash and run an application on real
hardware:
Build your application, as described in Build an Application.
Make sure your board is attached to your host computer. Usually, you’ll do this via USB.
Run this console command from the build directory,
<home>/app/build, to flash the compiled Zephyr binary and run it on your board:ninja flash
The Zephyr build system integrates with the board support files to use hardware-specific tools to flash the Zephyr binary to your hardware, then run it.
Each time you run the flash command, your application is rebuilt and flashed again.
In cases where board support is incomplete, flashing via the Zephyr build system may not be supported. If you receive an error message about flash support being unavailable, consult your board’s documentation for additional information on how to flash your board.
Note
When developing on Linux, it’s common to need to install board-specific udev rules to enable USB device access to your board as a non-root user. If flashing fails, consult your board’s documentation to see if this is necessary.
Running in an Emulator
The kernel has built-in emulator support for QEMU (on Linux/macOS only, this is not yet supported on Windows). It allows you to run and test an application virtually, before (or in lieu of) loading and running it on actual target hardware. Follow these instructions to run an application via QEMU:
Build your application for one of the QEMU boards, as described in Build an Application.
For example, you could set
BOARDto:qemu_x86to emulate running on an x86-based boardqemu_cortex_m3to emulate running on an ARM Cortex M3-based board
Run this console command from the build directory,
<home>/app/build, to flash the compiled Zephyr binary and run it in QEMU:ninja runPress Ctrl A, X to stop the application from running in QEMU.
The application stops running and the terminal console prompt redisplays.
Each time you execute the run command, your application is rebuilt and run again.
Note
The run target will use the QEMU binary available from the Zephyr
SDK by default. To use an alternate version of QEMU, for example the
version installed on your host or a custom version, set the
environment variable QEMU_BIN_PATH to the alternate path.
Custom Board and SOC Definitions
In cases where the board or platform you are developing for is not yet supported by Zephyr, you can add the board and SOC definition to your application and build for this board or SOC without having to add them to the Zephyr tree.
The structure needed to support out-of-tree board and SOC development is similar to how boards and SOCs are maintained in the Zephyr tree. By using this structure, it will be much easier to upstream your platform related work into the Zephyr tree after your initial development is done.
Add the custom board to your application or a dedicated repository using the following structure:
boards/
soc/
CMakeLists.txt
prj.conf
README.rst
src/
where the boards directory hosts the board you are building for:
.
├── boards
│   └── x86
│       └── my_custom_board
│           ├── doc
│           │   └── img
│           └── support
└── src
and the soc directory hosts any SOC code. You can also have boards that are
supported by a SOC that is available in the Zephyr tree.
Boards
Use the proper architecture folder name (e.g., x86, arm, etc.)
under boards for my_custom_board. (See Supported Boards for a
list of board architectures.)
Documentation (under doc/) and support files (under support/) are optional, but
will be needed when submitting to Zephyr.
The contents of my_custom_board should follow the same guidelines for any
Zephyr board, and provide the following files:
my_custom_board_defconfig
my_custom_board.dts
my_custom_board.yaml
board.cmake
board.h
CMakeLists.txt
doc/
dts_fixup.h
Kconfig.board
Kconfig.defconfig
pinmux.c
support/
Once the board structure is in place, you can build your application
targeting this board by specifying the location of your custom board
information with the -DBOARD_ROOT parameter to the CMake
build system:
cmake -DBOARD=<board name> -DBOARD_ROOT=<path to boards> ..
This will use your custom board configuration and will generate the Zephyr binary into your application directory.
You can also define the BOARD_ROOT variable in the application
CMakeLists.txt file.
SOC Definitions
Similar to board support, the structure is similar to how SOCs are maintained in the Zephyr tree, for example:
soc
└── arm
    └── st_stm32
            ├── common
            └── stm32l0
The paths to any Kconfig files inside the structure needs to prefixed with $(SOC_DIR) to make Kconfig aware of the location of the Kconfig files related to the custom SOC.
In the soc directory you will need a top-level Kconfig file pointing to the
custom SOC definitions:
choice
        prompt "SoC/CPU/Configuration Selection"

source "$(SOC_DIR)/$(ARCH)/\*/Kconfig.soc"

endchoice

menu "Hardware Configuration"
osource "$(SOC_DIR)/$(ARCH)/\*/Kconfig"

endmenu
Once the SOC structure is in place, you can build your application
targeting this platform by specifying the location of your custom platform
information with the -DSOC_ROOT parameter to the CMake
build system:
cmake -DBOARD=<board name> -DSOC_ROOT=<path to soc> -DBOARD_ROOT=<path to boards> ..
This will use your custom platform configurations and will generate the Zephyr binary into your application directory.
You can also define the SOC_ROOT variable in the application
CMakeLists.txt file.
Modules (External projects)
Zephyr relies on the source code of several externally maintained projects in order to avoid reinventing the wheel and to reuse as much well-established, mature code as possible when it makes sense. In the context of Zephyr’s build system those are called modules. These modules must be integrated with the Zephyr build system, which is described in more detail in other sections on this page.
There are several categories of external projects that Zephyr depends on, including:
- Debugger integration
- Silicon vendor Hardware Abstraction Layers (HALs)
- Cryptography libraries
- Filesystems
- Inter-Process Communication (IPC) libraries
The build system variable ZEPHYR_MODULES is a CMake list of
absolute paths to the directories containing Zephyr modules. These modules
contain CMakeLists.txt and Kconfig files describing how to
build and configure them, respectively. Module CMakeLists.txt files are
added to the build using CMake’s add_subdirectory() command, and the
Kconfig files are included in the build’s Kconfig menu tree.
If you have west installed, you don’t need to worry about how this variable is defined unless you are adding a new module. The build system knows how to use west to set ZEPHYR_MODULES. You can add additional modules to this list by setting the ZEPHYR_EXTRA_MODULES CMake variable. This can be useful if you want to keep the list of modules found with west and also add your own.
Finally, you can also specify the list of modules yourself in various ways, or not use modules at all if your application doesn’t need them.
Module Initialization Using West
If west is installed and ZEPHYR_MODULES is not already set, the build system finds all the modules in your west installation and uses those. It does this by running west list to get the paths of all the projects in the installation, then filters the results to just those projects which have the necessary module metadata files.
Each project in the west list output is tested like this:
If the project contains a file named
zephyr/module.yml, then its contents should look like this:build: cmake: <cmake-directory> kconfig: <directory>/Kconfig
The
cmake: <cmake-directory>part specifies that<cmake-directory>contains theCMakeLists.txtto use. Thekconfig: <directory>/Kconfigpart specifies the Kconfig file to use. Neither is required:cmakedefaults tozephyr, andkconfigdefaults tozephyr/Kconfig.Here is an example
module.ymlfile referring toCMakeLists.txtandKconfigfiles in the root directory of the module:build: cmake: . kconfig: Kconfig
Otherwise (i.e. if the project has no
zephyr/module.yml), then the build system looks forzephyr/CMakeLists.txtandzephyr/Kconfigfiles in the project. If both are present, the project is considered a module, and those files will be added to the build.If neither of those checks succeed, the project is not considered a module, and is not added to ZEPHYR_MODULES.
Module Initialization Without West
If you don’t have west installed or don’t want the build system to use it to
find Zephyr modules, you can set ZEPHYR_MODULES yourself using one
of the following options. Each of the directories in the list must contain
either a zephyr/module.yml file or the files
zephyr/CMakeLists.txt and Kconfig, as described in the previous
section.
At the CMake command line, like this:
cmake -DZEPHYR_MODULES=<path-to-module1>[;<path-to-module2>[...]] ...At the top of your application’s top level
CMakeLists.txt, like this:set(ZEPHYR_MODULES <path-to-module1> <path-to-module2> [...]) include($ENV{ZEPHYR_BASE}/cmake/app/boilerplate.cmake NO_POLICY_SCOPE)
If you choose this option, make sure to set the variable before including the boilerplate file, as shown above.
In a separate CMake script which is pre-loaded to populate the CMake cache, like this:
# Put this in a file with a name like "zephyr-modules.cmake"
set(ZEPHYR_MODULES <path-to-module1> <path-to-module2>
  CACHE STRING "pre-cached modules")
You can tell the build system to use this file by adding
-C
zephyr-modules.cmake
to your CMake command line.
Not Using Modules
If you don’t have west installed and don’t specify ZEPHYR_MODULES yourself, then no additional modules are added to the build. You will still be able to build any applications that don’t require code or Kconfig options defined in an external repository.
Application Debugging
This section is a quick hands-on reference to start debugging your application with QEMU. Most content in this section is already covered in QEMU and GNU_Debugger reference manuals.
In this quick reference, you’ll find shortcuts, specific environmental variables, and parameters that can help you to quickly set up your debugging environment.
The simplest way to debug an application running in QEMU is using the GNU Debugger and setting a local GDB server in your development system through QEMU.
You will need an Executable and Linkable Format (ELF) binary image for
debugging purposes. The build system generates the image in the build
directory. By default, the kernel binary name is
zephyr.elf. The name can be changed using a Kconfig option.
We will use the standard 1234 TCP port to open a GDB server instance. This port number can be changed for a port that best suits the development environment.
You can run QEMU to listen for a “gdb connection” before it starts executing any code to debug it.
qemu -s -S <image>
will setup Qemu to listen on port 1234 and wait for a GDB connection to it.
The options used above have the following meaning:
-SDo not start CPU at startup; rather, you must type ‘c’ in the monitor.-sShorthand for-gdb tcp::1234: open a GDB server on TCP port 1234.
To debug with QEMU and to start a GDB server and wait for a remote connect, run the following inside the build directory of an application:
ninja debugserver
The build system will start a QEMU instance with the CPU halted at startup and with a GDB server instance listening at the TCP port 1234.
Using a local GDB configuration .gdbinit can help initialize your GDB
instance on every run.
In this example, the initialization file points to the GDB server instance.
It configures a connection to a remote target at the local host on the TCP
port 1234. The initialization sets the kernel’s root directory as a
reference.
The .gdbinit file contains the following lines:
target remote localhost:1234
dir ZEPHYR_BASE
Note
Substitute ZEPHYR_BASE for the current kernel’s root directory.
Execute the application to debug from the same directory that you chose for
the gdbinit file. The command can include the --tui option
to enable the use of a terminal user interface. The following commands
connects to the GDB server using gdb. The command loads the symbol
table from the elf binary file. In this example, the elf binary file name
corresponds to zephyr.elf file:
..../path/to/gdb --tui zephyr.elf
Note
The GDB version on the development system might not support the –tui option. Please make sure you use the GDB binary from the SDK which corresponds to the toolchain that has been used to build the binary.
If you are not using a .gdbinit file, issue the following command inside GDB to connect to the remote GDB server on port 1234:
(gdb) target remote localhost:1234
Finally, the command below connects to the GDB server using the Data
Displayer Debugger (ddd). The command loads the symbol table from the
elf binary file, in this instance, the zephyr.elf file.
The DDD may not be installed in your
development system by default. Follow your system instructions to install
it. For example, use sudo apt-get install ddd on an Ubuntu system.
ddd --gdb --debugger "gdb zephyr.elf"
Both commands execute the gdb. The command name might change depending on the toolchain you are using and your cross-development tools.
Eclipse Debugging
Overview
CMake supports generating a project description file that can be imported into the Eclipse Integrated Development Environment (IDE) and used for graphical debugging.
The GNU MCU Eclipse plug-ins provide a mechanism to debug ARM projects in Eclipse with pyOCD, Segger J-Link, and OpenOCD debugging tools.
The following tutorial demonstrates how to debug a Zephyr application in Eclipse with pyOCD in Windows. It assumes you have already installed the GCC ARM Embedded toolchain and pyOCD.
Set Up the Eclipse Development Environment
- Download and install Eclipse IDE for C/C++ Developers.
- In Eclipse, install the GNU MCU Eclipse plug-ins by opening the menu
Window->Eclipse Marketplace..., searching forGNU MCU Eclipse, and clickingInstallon the matching result. - Configure the path to the pyOCD GDB server by opening the menu
Window->Preferences, navigating toMCU, and setting theGlobal pyOCD Path.
Generate and Import an Eclipse Project
At a command line, configure your environment to use the GCC ARM Embedded compiler as shown in 3rd Party Toolchains.
Navigate to a folder outside of the Zephyr tree to build your application.
# On Windows
cd %userprofile%
Note
If the build directory is a subdirectory of the source directory, as is usually done in Zephyr, CMake will warn:
“The build directory is a subdirectory of the source directory.
This is not supported well by Eclipse. It is strongly recommended to use a build directory which is a sibling of the source directory.”
Configure your application with CMake and build it with ninja. Note the different CMake generator specified by the
-G"Eclipse CDT4 - Ninja"argument. This will generate an Eclipse project description file,.project, in addition to the usual ninja build files.# On Windows mkdir build && cd build cmake -G"Eclipse CDT4 - Ninja" -DBOARD=frdm_k64f %ZEPHYR_BASE%\samples\synchronization ninja
In Eclipse, import your generated project by opening the menu
File->Import...and selecting the optionExisting Projects into Workspace. Browse to your application build directory in the choice,Select root directory:. Check the box for your project in the list of projects found and click theFinishbutton.
Create a Debugger Configuration
Open the menu
Run->Debug Configurations....Select
GDB PyOCD Debugging, click theNewbutton, and configure the following options:In the Main tab:
- Project: my_zephyr_app@build
- C/C++ Application:
zephyr/zephyr.elf
In the Debugger tab:
- pyOCD Setup
- Executable path:
$pyocd_path\$pyocd_executable - Uncheck “Allocate console for semihosting”
- Executable path:
- Board Setup
- Bus speed: 8000000 Hz
- Uncheck “Enable semihosting”
- GDB Client Setup
- Executable path:
C:\gcc-arm-none-eabi-6_2017-q2-update\bin\arm-none-eabi-gdb.exe
- Executable path:
- pyOCD Setup
In the SVD Path tab:
- File path:
<zephyr
base>\ext\hal\nxp\mcux\devices\MK64F12\MK64F12.xml
Note
This is optional. It provides the SoC’s memory-mapped register addresses and bitfields to the debugger.
- File path:
Click the
Debugbutton to start debugging.
RTOS Awareness
Support for Zephyr RTOS awareness is implemented in pyOCD v0.11.0 and later. It is compatible with GDB PyOCD Debugging in Eclipse, but you must enable CONFIG_OPENOCD_SUPPORT=y in your application.
CMake Details
Overview
CMake is used to build your application together with the Zephyr kernel. A CMake build is done in two stages. The first stage is called configuration. During configuration, the CMakeLists.txt build scripts are executed. After configuration is finished, CMake has an internal model of the Zephyr build, and can generate build scripts that are native to the host platform.
CMake supports generating scripts for several build systems, but only Ninja and Make are tested and supported by Zephyr. After configuration, you begin the build stage by executing the generated build scripts. These build scripts can recompile the application without involving CMake following most code changes. However, after certain changes, the configuration step must be executed again before building. The build scripts can detect some of these situations and reconfigure automatically, but there are cases when this must be done manually.
Zephyr uses CMake’s concept of a ‘target’ to organize the build. A target can be an executable, a library, or a generated file. For application developers, the library target is the most important to understand. All source code that goes into a Zephyr build does so by being included in a library target, even application code.
Library targets have source code, that is added through CMakeLists.txt build scripts like this:
target_sources(app PRIVATE src/main.c)
In the above CMakeLists.txt, an existing library target named app
is configured to include the source file src/main.c. The PRIVATE
keyword indicates that we are modifying the internals of how the library is
being built. Using the keyword PUBLIC would modify how other
libraries that link with app are built. In this case, using PUBLIC
would cause libraries that link with app to also include the
source file src/main.c, behavior that we surely do not want. The
PUBLIC keyword could however be useful when modifying the include
paths of a target library.
Application CMakeLists.txt
Every application must have a CMakeLists.txt file. This file is the
entry point, or top level, of the build system. The final zephyr.elf
image contains both the application and the kernel libraries.
This section describes some of what you can do in your CMakeLists.txt.
Make sure to follow these steps in order.
If you only want to build for one board, add the name of the board configuration for your application on a new line. For example:
set(BOARD qemu_x86)
Refer to Supported Boards for more information on available boards.
The Zephyr build system determines a value for BOARD by checking the following, in order (when a BOARD value is found, CMake stops looking further down the list):
- Any previously used value as determined by the CMake cache takes highest precedence. This ensures you don’t try to run a build with a different BOARD value than you set during the build configuration step.
- Any value given on the CMake command line using
-DBOARD=YOUR_BOARDwill be checked for and used next. - If an environment variable
BOARDis set, its value will then be used. - Finally, if you set
BOARDin your applicationCMakeLists.txtas described in this step, this value will be used.
If your application uses a configuration file or files other than the usual
prj.conf(orprj_YOUR_BOARD.conf, whereYOUR_BOARDis a board name), add lines setting the CONF_FILE variable to these files appropriately. If multiple filenames are given, separate them by a single space or semicolon. CMake lists can be used to build up configuration fragment files in a modular way when you want to avoid setting CONF_FILE in a single place. For example:set(CONF_FILE "fragment_file1.conf") list(APPEND CONF_FILE "fragment_file2.conf")
More details are available below in Kconfig Configuration.
If your application uses a Device Tree overlay file or files other than the usual
<board>.overlay, add lines setting the DTC_OVERLAY_FILE variable to these files appropriately.More details are available below in Device Tree Overlays.
If your application has its own kernel configuration options, create a
Kconfigfile in the same directory as your application’sCMakeLists.txt.An (unlikely) advanced use case would be if your application has its own unique configuration options that are set differently depending on the build configuration.
If you just want to set application specific values for existing Zephyr configuration options, refer to the CONF_FILE description above.
Structure your
Kconfigfile like this:# SPDX-License-Identifier: Apache-2.0 mainmenu "Your Application Name" # Your application configuration options go here # Sources Kconfig.zephyr in the Zephyr root directory. # # Note: All 'source' statements work relative to the Zephyr root directory (due # to the $srctree environment variable being set to $ZEPHYR_BASE). If you want # to 'source' relative to the current Kconfig file instead, use 'rsource' (or a # path relative to the Zephyr root). source "Kconfig.zephyr"
Note
Environment variables in
sourcestatements are expanded directly, so you do not need to define anoption env="ZEPHYR_BASE"Kconfig “bounce” symbol. If you use such a symbol, it must have the same name as the environment variable.See the Kconfig extensions section in the Board Porting Guide for more information.
The
Kconfigfile is automatically detected when placed in the application directory, but it is also possible for it to be found elsewhere if the CMake variable KCONFIG_ROOT is set with an absolute path.Now include the mandatory boilerplate that integrates the application with the Zephyr build system on a new line, after any lines added from the steps above:
include($ENV{ZEPHYR_BASE}/cmake/app/boilerplate.cmake NO_POLICY_SCOPE)
project(my_zephyr_app)
Now add any application source files to the ‘app’ target library, each on their own line, like so:
target_sources(app PRIVATE src/main.c)
Below is a simple example CMakeList.txt:
set(BOARD qemu_x86)

include($ENV{ZEPHYR_BASE}/cmake/app/boilerplate.cmake NO_POLICY_SCOPE)
project(my_zephyr_app)

target_sources(app PRIVATE src/main.c)
The Cmake property HEX_FILES_TO_MERGE
leverages the application configuration provided by
Kconfig and CMake to let you merge externally built hex files
with the hex file generated when building the Zephyr application.
For example:
set_property(GLOBAL APPEND PROPERTY HEX_FILES_TO_MERGE
    ${app_bootloader_hex}
    ${PROJECT_BINARY_DIR}/${KERNEL_HEX_NAME}
    ${app_provision_hex})
CMakeCache.txt
CMake uses a CMakeCache.txt file as persistent key/value string storage used to cache values between runs, including compile and build options and paths to library dependencies. This cache file is created when CMake is run in an empty build folder.
For more details about the CMakeCache.txt file see the official CMake documentation runningcmake .
Application Configuration
Kconfig Configuration
The initial configuration for an application is produced by merging configuration settings from three sources:
- A BOARD-specific configuration file, stored in
boards/ARCHITECTURE/BOARD/BOARD_defconfigin the Zephyr base directory. - Any CMakeCache entries entries that are prefixed with CONFIG_.
- One or more application-specific configuration files.
The application-specific configuration file(s) can be specified in any of the
following ways. The simplest option is to just have a single prj.conf
file.
- If CONF_FILE is set in
CMakeLists.txt(before including the boilerplate.cmake file), or is present in the CMake variable cache, the configuration files specified in it are merged and used as the application-specific settings. - Otherwise (if (1.) does not apply), if a file
prj_BOARD.confexists in the application directory, where BOARD is the BOARD value set earlier, the settings in it are used. - Otherwise (if (2.) does not apply), if a file
boards/BOARD.confexists in the application directory, where BOARD is the BOARD value set earlier, the settings in it are merged withprj.confand used. - Otherwise, if a file
prj.confexists in the application directory, the settings in it are used.
Configuration settings that have not been specified fall back on their
default value, as given in the Kconfig files.
The merged configuration is saved in zephyr/.config in the build
directory.
As long as zephyr/.config exists and is up-to-date (is newer than the
BOARD and application configuration files), it will be used in
preference to producing a new merged configuration. This can be used during
development, as described below in Overriding the Default Configuration.
For more information on Zephyr’s Kconfig configuration scheme, see the Setting configuration values section in the Board Porting Guide. For some tips and general recommendations when writing Kconfig files, see the Kconfig - Tips and Best Practices page.
For information on available kernel configuration options, including inter-dependencies between options, see the Configuration Options.
Note
Dependencies between options can also be viewed in the interactive configuration interface, which is explained in the Overriding the Default Configuration section. It will have the most up-to-date dependencies, and also shows which dependencies are currently unsatisfied.
To view the dependencies of an option in the configuration interface, jump to it with / and press ?. For each unsatisfied dependency, jump to it in turn to check its dependencies.
Setting Application Configuration Values
This section describes how to edit Zephyr configuration
(.conf) files.
Add each configuration entry on a new line.
Enable or disable a boolean option by setting its value to
yorn:CONFIG_SOME_BOOL=y CONFIG_SOME_OTHER_BOOL=n
Note
Another way to set a boolean symbol to
nis with a comment with the following format:# CONFIG_SOME_OTHER_BOOL is not set
This style is accepted for a technical reason: Kconfig configuration files can be parsed as makefiles (though Zephyr doesn’t use this). Having
n-valued symbols correspond to unset variables simplifies tests in Make.You can set integer and string options as well, like this:
CONFIG_SOME_INT=42
CONFIG_SOME_STRING="the best value ever"
Ensure that each entry setting an option contains no spaces (including on either side of the = sign).
Use a # followed by a space to comment a line:
# This is a comment.
The example below shows a comment line and an override setting
CONFIG_PRINTK to y:
# Enable printk for debugging
CONFIG_PRINTK=y
Overriding the Default Configuration
An interactive configuration interface is available for making temporary changes to the configuration. This can be handy during development.
Note
The configuration can also be changed by editing zephyr/.config in
the application build directory by hand. Using the configuration interface
is safer, as it correctly handles dependencies between configurations
symbols.
To make a setting permanent, you should set it in a .conf file, as
described above in Setting Application Configuration Values.
The steps below will run the interactive configuration interface:
Create a build directory
<home>/app/buildinside your application directory and generate build files inside it with CMake, as follows:# On Linux/macOS cd ~/app # On Windows cd %userprofile%\app mkdir build && cd build cmake -GNinja ..
Run the following command from the build directory (
<home>/app/build) to start the configuration interface:ninja menuconfig
The configuration interface is shown below:
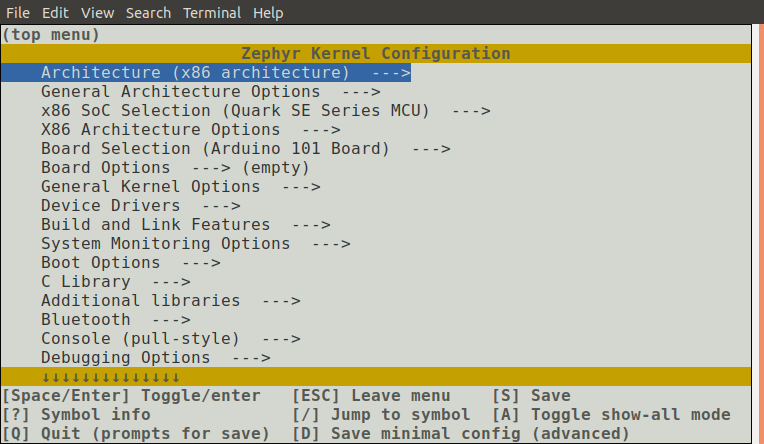
Change configuration symbols to their desired values as follows:
Use the arrow keys to navigate the menu.
Note
Common Vim key bindings are supported as well.
Press Enter or Space to enter submenus and choices, which appear with
--->next to them. Press ESC returns to the parent menu.Press Space to toggle or configure a symbol value. Boolean configuration symbols are shown with [ ] brackets, while numeric and string-valued configuration symbols are shown with ( ) brackets.
Note
You can also press Y or N to set a boolean configuration symbol, to the corresponding value.
Press ? to display information about the currently selected symbol. Press ESC or Q to return from the information display to the menu.
After configuring the kernel options for your application, press Q to bring up the save-and-quit dialog:

Press Y to save the kernel configuration options to the default filename (
zephyr/.config).Typically, you will save to the default filename unless you are experimenting with various configuration scenarios.
Note
At present, the configuration file used during building is always
zephyr/.config. If you have another saved configuration that you want to build with, copy it tozephyr/.config. Make sure to back up your original configuration file.Also note that filenames starting with
.are not listed bylsby default on Linux and macOS. Use the-aflag to see them.
Finding a symbol in the menu tree and navigating to it can be tedious. To jump directly to a symbol, press the / key. This brings up the following dialog, where you can search for symbols by name and jump to them:
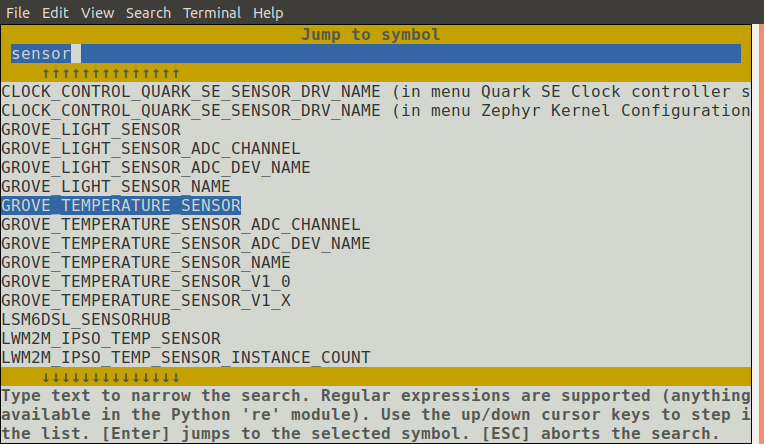
If you jump to a symbol that isn’t currently visible (e.g., due to having unsatisfied dependencies) then show-all mode will be enabled. In show-all mode, all symbols are displayed, including currently invisible symbols. To disable show-all mode, press A.
Note
Show-all mode can’t be disabled if there are no visible items in the menu.
To figure out why a symbol you jumped to isn’t visible, inspect its dependencies by pressing ?. If you discover that the symbol depends on another symbol that isn’t enabled, you can jump to that symbol, in turn, to see if it can be enabled.
Device Tree Overlays
As described in Device Tree, Zephyr uses Device Tree to describe the hardware it runs on. This section describes how you can modify an application build’s device tree using overlay files. For additional information regarding the relationship between Device Tree and Kconfig see Device Tree vs Kconfig. In some cases the information contained in Device Tree files is closely connected to the software and might need to be modified using the overlay file concept. This can be relevant for many of the different Device Tree nodes, but is particularly useful for certain types of nodes.
Overlay files, which customarily have the .overlay extension,
contain device tree fragments which add to or modify the device tree
used while building a Zephyr application. To add an overlay file or
files to the build, set the CMake variable DTC_OVERLAY_FILE
to a whitespace-separated list of your overlay files.
The Zephyr build system begins creation of a device tree by running the C preprocessor on a file which includes the following:
Configuration options from Kconfig.
The board’s device tree source file, which by default is the Zephyr file
boards/<ARCHITECTURE>/<BOARD>/<BOARD>.dts. (This location can be overridden by setting the DTS_SOURCE CMake variable.)Any “common” overlays provided by the build system. Currently, this is just the file
dts/common/common.dts. (The common overlays can be overridden by setting the DTS_COMMON_OVERLAYS CMake variable.)The file
common.dtsconditionally includes device tree fragments based on Kconfig settings. For example, it includes a fragment for MCUboot chain-loading, located atdts/common/mcuboot.overlay, ifCONFIG_BOOTLOADER_MCUBOOTis set.Any file or files given by the DTC_OVERLAY_FILE CMake variable.
The Zephyr build system determines DTC_OVERLAY_FILE as follows:
- Any value given to DTC_OVERLAY_FILE in your application
CMakeLists.txt(before including the boilerplate.cmake file), passed to the the CMake command line, or present in the CMake variable cache, takes precedence. - The environment variable
DTC_OVERLAY_FILEis checked next. This mechanism is now deprecated; users should set this variable using CMake instead of the environment. - If the file
BOARD.overlayexists in your application directory, whereBOARDis the BOARD value set earlier, it will be used.
If DTC_OVERLAY_FILE specifies multiple files, they are included in order by the C preprocessor.
After running the preprocessor, the final device tree used in the
build is created by running the device tree compiler, dtc, on the
preprocessor output.
Application-Specific Code
Application-specific source code files are normally added to the
application’s src directory. If the application adds a large
number of files the developer can group them into sub-directories
under src, to whatever depth is needed.
Application-specific source code should not use symbol name prefixes that have been reserved by the kernel for its own use. For more information, see Naming Conventions.
Support for building third-party library code
It is possible to build library code outside the application’s src
directory but it is important that both application and library code targets
the same Application Binary Interface (ABI). On most architectures there are
compiler flags that control the ABI targeted, making it important that both
libraries and applications have certain compiler flags in common. It may also
be useful for glue code to have access to Zephyr kernel header files.
To make it easier to integrate third-party components, the Zephyr
build system has defined CMake functions that give application build
scripts access to the zephyr compiler options. The functions are
documented and defined in cmake/extensions.cmake
and follow the naming convention zephyr_get_<type>_<format>.
The following variables will often need to be exported to the third-party build system.
CMAKE_C_COMPILER,CMAKE_AR.ARCHandBOARD, together with several variables that identify the Zephyr kernel version.
samples/application_development/external_lib is a sample project that demonstrates some of these features.