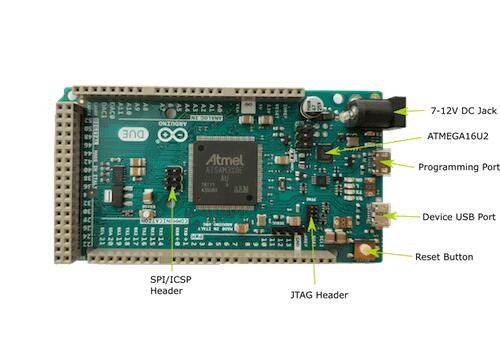
Arduino Due
Overview
The arduino_due board configuration is used by Zephyr applications that run on the Arduino Due board. It provides support for the Atmel SAM3X8E ARM Cortex-M3 CPU and the following devices:
Nested Vectored Interrupt Controller (NVIC)
System Tick System Clock (SYSTICK)
Serial Port over USB (ATMEL_SAM3)
More information about the board can be found at the Arduino Due website [1]. The Atmel SAM3X8E Datasheet [2] has the information and the datasheet about the processor.
Note
This configuration is not supported by Arduino.

Hardware
Supported Features
The arduino_due board configuration supports the following hardware features:
Interface |
Controller |
Driver/Component |
|---|---|---|
NVIC |
on-chip |
nested vectored interrupt controller |
SYSTICK |
on-chip |
system clock |
UART |
on-chip |
serial port |
GPIO |
on-chip |
gpio |
I2C |
on-chip |
i2c |
Watchdog |
on-chip |
watchdog |
Other hardware features are not currently supported by the Zephyr kernel. See Arduino Due website [1] and Atmel SAM3X8E Datasheet [2] for a complete list of Arduino Due board hardware features.
The default configuration can be found in the Kconfig boards/arduino/due/arduino_due_defconfig.
Note
For I2C, pull-up resistors are required for using SCL1 and SDA1 (near IO13).
Interrupt Controller
There are 15 fixed exceptions including exceptions 12 (debug monitor) and 15 (SYSTICK) that behave more as interrupts than exceptions. In addition, there can be a variable number of IRQs. Exceptions 7-10 and 13 are reserved. They don’t need handlers.
A Cortex-M3/4-based board uses vectored exceptions. This means each exception calls a handler directly from the vector table.
Handlers are provided for exceptions 1-6, 11-12, and 14-15. The table here identifies the handlers used for each exception.
Exc# |
Name |
Remarks |
Used by Zephyr Kernel |
|---|---|---|---|
1 |
Reset |
system initialization |
|
2 |
NMI |
system fatal error |
|
3 |
Hard fault |
system fatal error |
|
4 |
MemManage |
MPU fault |
system fatal error |
5 |
Bus |
system fatal error |
|
6 |
Usage fault |
undefined instruction, or switch attempt to ARM mode |
system fatal error |
11 |
SVC |
system calls, kernel run-time exceptions, and IRQ offloading |
|
12 |
Debug monitor |
system fatal error |
|
14 |
PendSV |
context switch |
|
15 |
SYSTICK |
system clock |
Note
After a reset, all exceptions have a priority of 0. Interrupts cannot run at priority 0 for the interrupt locking mechanism and exception handling to function properly.
System Clock
Arduino Due has two external oscillators/resonators. The slow clock is 32.768 kHz, and the main clock is 12 MHz. The processor can set up PLL to drive the master clock, which can be set as high as 84 MHz.
Serial Port
The Atmel SAM3X8E processor has a single UART that is used by the SAM-BA bootloader. This UART has only two wires for RX/TX and does not have flow control (CTS/RTS) or FIFO. The RX/TX pins are connected to the ATmega16U2, which provides USB-to-TTL serial function. The Zephyr console output, by default, is utilizing this controller.
Programming and Debugging
Flashing
BOSSA Tool
Flashing the Zephyr kernel onto Arduino Due requires the bossa tool [3].
There are GUI and command line versions of the bossa tool. The following section provides the steps to build the command line version. Please refer to the bossa tool’s README file on how to build the GUI version.
To build the bossa tool, follow these steps:
Checkout the bossa tool’s code from the repository.
$ git clone https://github.com/shumatech/BOSSA.git
$ cd BOSSA
Checkout the arduino branch. The code on the master branch does not work with Arduino Due.
$ git checkout arduino
Build the command line version of the bossa tool.
$ make bin/bossac
The resulting binary is available at
bin/bossac.
Flashing an Application to Arduino Due
Applications for the arduino_due board configuration can be built
and flashed in the usual way (see Building an Application and
Run an Application for more details).
Here is an example for the Hello World application. After building the application, press the Reset button before running the flash command, so the board will boot into the SAM-BA bootloader and be prepared to receive the new program.
# From the root of the zephyr repository
west build -b arduino_due samples/hello_world
west flash
After flashing the application, run your favorite terminal program to
listen for output. For example, under Linux, the terminal should be
/dev/ttyACM0. For example:
$ sudo minicom -D /dev/ttyACM0 -o
The -o option tells minicom not to send the modem initialization string.
Now press the Reset button and you should see “Hello World! arduino_due” in your terminal.
Note
Make sure your terminal program is closed before flashing the binary image, or it will interfere with the flashing process.