SAM4S Xplained
Overview
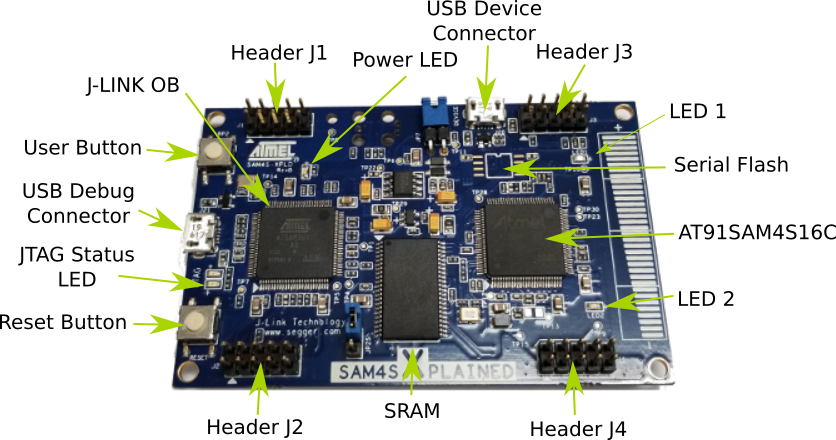
The SAM4S Xplained evaluation kit is a development platform to evaluate the Atmel SAM4S series microcontrollers.
Hardware
- ATSAM4S16C ARM Cortex-M4 Processor
- 12 MHz crystal oscillator
- internal 32.768 kHz crystal oscillator
- IS66WV51216DALL 8 Mb SRAM
- Micro-AB USB device
- Micro-AB USB debug interface supporting SEGGER OB and Virtual COM Port and Data
- One reset and one user pushbutton
- 2 yellow user LEDs
- IC pads for external flash chip
Supported Features
The sam4s_xplained board configuration supports the following hardware features:
| Interface | Controller | Driver/Component |
|---|---|---|
| NVIC | on-chip | nested vector interrupt controller |
| SYSTICK | on-chip | systick |
| UART | on-chip | serial port |
Other hardware features are not currently supported by Zephyr.
The default configuration can be found in the Kconfig
boards/arm/sam4s_xplained/sam4s_xplained_defconfig.
Connections and IOs
The SAM4S Xplained Online User Guide [1] has detailed information about board connections. Download the SAM4S Xplained Schematic [3] for more detail.
System Clock
The SAM4S MCU is configured to use the 12 MHz internal oscillator on the board with the on-chip PLL to generate an 84 MHz system clock.
Serial Port
The ATSAM4S16C MCU has 2 UARTs and 2 USARTs. One of the UARTs (UART0) is connected to the Segger J-Link OB chip (the AT91SAM3U4 is programmed to be Segger J-Link OB). Segger J-Link OB brings the UART out as a virtual COM port.
Programming and Debugging
The SAM4S Xplained board comes with Segger J-Link OB. This provides a debug interface to the SAM4S16C chip. You can use Ozone or JLink to communicate with the SAM4S16C.
Flashing
Build the Zephyr kernel and the Hello World sample application:
$ cd $ZEPHYR_BASE/samples/hello_world/
$ make BOARD=sam4s_xplained
Connect the SAM4S Xplained board to your host computer using the USB debug port.
Run your favorite terminal program to listen for output. Under Linux the terminal should be
/dev/ttyACM0. For example:$ minicom -D /dev/ttyACM0 -oThe -o option tells minicom not to send the modem initialization string. Connection should be configured as follows:
- Speed: 115200
- Data: 8 bits
- Parity: None
- Stop bits: 1
Download JLink from the Segger JLink Downloads Page [2]. Go to the section “J-Link Software and Documentation Pack” and install the “J-Link Software and Documentation pack for Linux”.
To flash an image open JLink and enter the following:
JLink> device at91sam4s16c
// Hit enter to accept JTAG as the default and the other default JTAG settings
JLink> connect
.
.
.
Device "ATSAM4S16C" selected.


TotalIRLen = 4, IRPrint = 0x01
AP-IDR: 0x24770011, Type: AHB-AP
Found Cortex-M4 r0p1, Little endian.
FPUnit: 6 code (BP) slots and 2 literal slots
CoreSight components:
ROMTbl 0 @ E00FF000
ROMTbl 0 [0]: FFF0F000, CID: B105E00D, PID: 000BB000 SCS
ROMTbl 0 [1]: FFF02000, CID: B105E00D, PID: 003BB002 DWT
ROMTbl 0 [2]: FFF03000, CID: B105E00D, PID: 002BB003 FPB
ROMTbl 0 [3]: FFF01000, CID: B105E00D, PID: 003BB001 ITM
ROMTbl 0 [4]: FFF41000, CID: B105900D, PID: 000BB9A1 TPIU
Found 1 JTAG device, Total IRLen = 4:
#0 Id: 0x4BA00477, IRLen: 04, IRPrint: 0x1, CoreSight JTAG-DP (ARM)
Cortex-M4 identified.

JLink> loadbin <zephyr.bin>, 0x400000
Downloading file [/home/justin/Zephyr/zephyr/samples/hello_world/outdir/zephyr.bin]...
Comparing flash   [100%] Done.
Erasing flash     [100%] Done.
Programming flash [100%] Done.
Verifying flash   [100%] Done.
J-Link: Flash download: Flash programming performed for 2 ranges (21504 bytes)
J-Link: Flash download: Total time needed: 0.549s (Prepare: 0.200s, Compare: 0.150s, Erase: 0.020s, Program: 0.094s, Verify: 0.001s, Restore: 0.081s)
O.K.
JLink> r
JLink> go
You should see “Hello World! arm” in your terminal.