Redbear Labs Nano
Overview
The Nano is a development board equipped with Nordic’s nRF51822 Bluetooth Low Energy SOC. This board is available on RedBear Store [1].
Hardware
nRF51 BLE Nano has two external oscillators. The frequency of the slow clock is 32.768 kHz. The frequency of the main clock is 16 MHz.
Supported Features
The nrf51_blenano board configuration supports the following nRF51 hardware features:
| Interface | Controller | Driver/Component |
|---|---|---|
| NVIC | on-chip | nested vectored interrupt controller |
| RTC | on-chip | system clock |
| UART | on-chip | serial port |
| GPIO | on-chip | gpio |
| FLASH | on-chip | flash |
| RADIO | on-chip | Bluetooth |
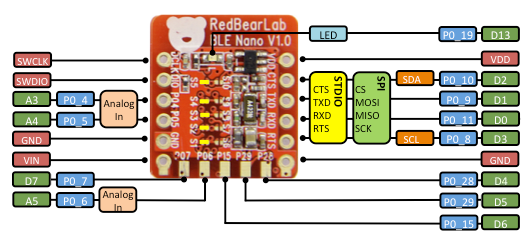
Connections and IOs
BLE nano pinout
DAPLink board

The DAPLink USB board acts as a dongle. DAPLink debug probes appear on the host computer as a USB disk. It also regulates 5V from USB to 3.3V via the onboard LDO to power Nano.
More information about Nano and DAPLink can be found at the RedBear Github [2].
Programming and Debugging
Applications for the nrf51_blenano board configuration can be built and
flashed in the usual way (see Build an Application and
Run an Application for more details).
Flashing
To flash an application, you’ll need to connect your BLE Nano with the DAPLink board, then attach that to your computer via USB.
Warning
Be careful to mount the BLE Nano correctly! The side of the board with the VIN and GND pins should face towards the USB connector. The RedBear Store [1] page links to a tutorial video that shows how to properly solder headers and assemble the DAPLink and BLE Nano boards.
Now build and flash applications as usual. Here is an example for the Hello World application.
# On Linux/macOS
cd $ZEPHYR_BASE/samples/hello_world
mkdir build && cd build

# On Windows
cd %ZEPHYR_BASE%\samples\hello_world
mkdir build & cd build


# Use cmake to configure a Ninja-based build system:
cmake -GNinja -DBOARD=nrf51_blenano ..

# Now run ninja on the generated build system:
ninja
ninja flash
Debugging
After mounting the BLE Nano on its DAPLink board as described above, you can debug an application in the usual way. Here is an example for the Hello World application.
# On Linux/macOS
cd $ZEPHYR_BASE/samples/hello_world
# If you already made a build directory (build) and ran cmake, just 'cd build' instead.
mkdir build && cd build

# On Windows
cd %ZEPHYR_BASE%\samples\hello_world
# If you already made a build directory (build) and ran cmake, just 'cd build' instead.
mkdir build & cd build

# If you already made a build directory (build) and ran cmake, just 'cd build' instead.

# Use cmake to configure a Ninja-based build system:
cmake -GNinja -DBOARD=nrf51_blenano ..

# Now run ninja on the generated build system:
ninja debug