SAM4S Xplained
Overview
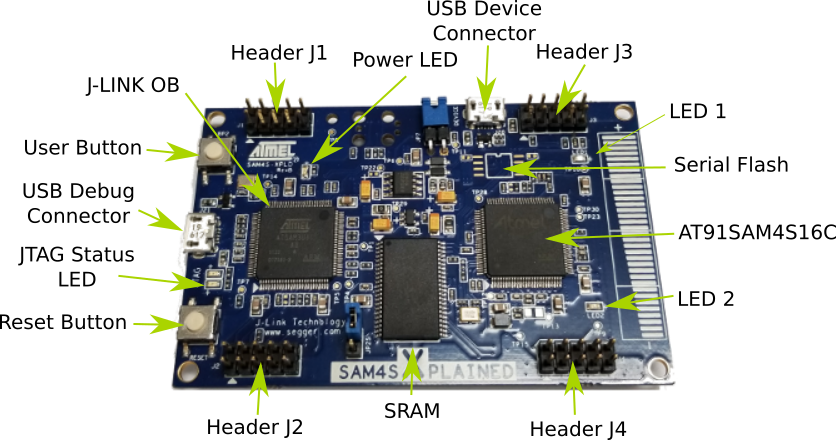
The SAM4S Xplained evaluation kit is a development platform to evaluate the Atmel SAM4S series microcontrollers.
Hardware
- ATSAM4S16C ARM Cortex-M4 Processor
- 12 MHz crystal oscillator
- internal 32.768 kHz crystal oscillator
- IS66WV51216DALL 8 Mb SRAM
- Micro-AB USB device
- Micro-AB USB debug interface supporting SEGGER OB and Virtual COM Port and Data
- One reset and one user pushbutton
- 2 yellow user LEDs
- IC pads for external flash chip
Supported Features
The sam4s_xplained board configuration supports the following hardware features:
| Interface | Controller | Driver/Component |
|---|---|---|
| NVIC | on-chip | nested vector interrupt controller |
| SYSTICK | on-chip | systick |
| UART | on-chip | serial port |
| I2C | on-chip | i2c |
| GPIO | on-chip | gpio |
Other hardware features are not currently supported by Zephyr.
The default configuration can be found in the Kconfig
boards/arm/sam4s_xplained/sam4s_xplained_defconfig.
Connections and IOs
The SAM4S Xplained Online User Guide [1] has detailed information about board connections. Download the SAM4S Xplained Schematic [3] for more detail.
System Clock
The SAM4S MCU is configured to use the 12 MHz internal oscillator on the board with the on-chip PLL to generate an 84 MHz system clock.
Serial Port
The ATSAM4S16C MCU has 2 UARTs and 2 USARTs. One of the UARTs (UART0) is connected to the Segger J-Link OB chip (the AT91SAM3U4 is programmed to be Segger J-Link OB). Segger J-Link OB brings the UART out as a virtual COM port. The section flashing uses the UART from the Segger USB debug connection.
Programming and Debugging
The SAM4S Xplained board comes with Segger J-Link OB. This provides a debug interface to the SAM4S16C chip. You can use Ozone or JLink to communicate with the SAM4S16C.
Flashing
Download JLink from the Segger JLink Downloads Page [2]. Go to the section “J-Link Software and Documentation Pack” and install the “J-Link Software and Documentation pack for Linux”. The application JLinkExe needs to be accessible from your path.
Run your favorite terminal program to listen for output. Under Linux the terminal should be
/dev/ttyACM0. For example:$ minicom -D /dev/ttyACM0 -oThe -o option tells minicom not to send the modem initialization string. Connection should be configured as follows:
- Speed: 115200
- Data: 8 bits
- Parity: None
- Stop bits: 1
Connect the SAM4S Xplained board to your host computer using the USB debug port. Then build and flash the Hello World application.
# On Linux/macOS
cd $ZEPHYR_BASE/samples/hello_world
mkdir build && cd build

# On Windows
cd %ZEPHYR_BASE%\samples\hello_world
mkdir build & cd build


# Use cmake to configure a Ninja-based build system:
cmake -GNinja -DBOARD=sam4s_xplained ..

# Now run ninja on the generated build system:
ninja
ninja flash
You should see “Hello World! arm” in your terminal.
Debugging
You can debug an application in the usual way. Here is an example for the Hello World application.
# On Linux/macOS
cd $ZEPHYR_BASE/samples/hello_world
# If you already made a build directory (build) and ran cmake, just 'cd build' instead.
mkdir build && cd build

# On Windows
cd %ZEPHYR_BASE%\samples\hello_world
# If you already made a build directory (build) and ran cmake, just 'cd build' instead.
mkdir build & cd build

# If you already made a build directory (build) and ran cmake, just 'cd build' instead.

# Use cmake to configure a Ninja-based build system:
cmake -GNinja -DBOARD=sam4s_xplained ..

# Now run ninja on the generated build system:
ninja debug