Panasonic Grid-EYE Shields
Overview
The Panasonic Grid-EYE is an infra-red sensor, which is comprised of 64 individual thermopile elements arranged in an 8x8 matrix.
The sensor comes in a compact surface mount package and can be very easily integrated into thermometry applications.
Grid-EYE is available in different varieties which differ in field of view, amplification factor and operating voltages. For example AMG8833 features a 60 degree field of view, a high gain amplification factor and 3.3V operating voltage.
For the different part numbers that follow the AMG88xx scheme please refer to IR Thermophile Array Sensor - Grid-EYE [1].
For sensor evaluation and rapid prototyping multiple shields are available:

Please note that the former follows the Arduino shield standard, while the
latter is a breakout board only. Please use the amg88xx_grid_eye_eval_shield
Grid-EYE shield designation for these boards.
For the Panasonic Grid-EYE sensor an older evaluation kit was available, that also could be used as an Arduino shield.
Panasonic Grid-EYE Evaluation Kit
Please note that this evaluation kit is no longer available and no online
documentation is available anymore. Please use the amg88xx_eval_kit
Grid-EYE shield designation for this board instead.
Requirements
These shields can only be used with a board that has Arduino connectors and where node aliases for I2C and GPIO interfaces are correctly defined in the board’s device tree.
This is true for example for Panasonic’s PAN1780/PAN1770, PAN1781 and PAN1782 evaluation boards (Panasonic Wireless Connectivity Development Hub [3]).
Jumper Configuration
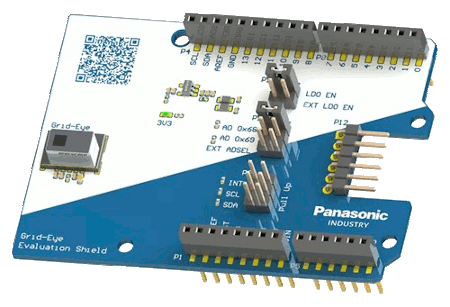
Panasonic Grid-EYE Evaluation Shield
The Grid-EYE sensor is powered using a LDO. Make sure to set a jumper on P10: LDO_EN.
A jumper on P11 configures the I2C address selection.
When you use the amg88xx_grid_eye_eval_shield Grid-EYE shield designation
make sure to use the following jumper configurations:
P10: LDO_EN
P11: AD 0x68
Panasonic Grid-EYE Evaluation Kit
On the AMG88xx Evaluation Kit, all jumpers except the J11 and J14 must be removed.
Pin Assignment
Panasonic Grid-EYE Evaluation Shield
The following table shows the complete pin assignment of the Grid-EYE Evaluation Shield.
Shield Connector Pin |
Function |
|---|---|
D2 |
Interrupt |
D14 |
I2C SDA |
D15 |
I2C SCL |
Power supply header pin 5 |
5V Power Supply |
Power supply header pin 6 |
GND |
Power supply header pin 7 |
GND |
For more detailed information please refer to Panasonic Grid-EYE Evaluation Shield [2].
For the Adafruit AMG8833 8x8 Thermal Camera Sensor [4] breakout board you can
use the amg88xx_grid_eye_eval_shield shield designation as well.
The wiring has to be done according to Adafruit AMG8833 8x8 Thermal Camera Sensor Pinouts [5] and the pin assignment table mentioned above.
Panasonic Grid-EYE Evaluation Kit
The following table shows the complete pin assignment of the Grid-EYE Evaluation Kit.
Shield Connector Pin |
Function |
|---|---|
D6 |
Interrupt |
D14 |
I2C SDA |
D15 |
I2C SCL |
Building
The samples/sensor/amg88xx application demonstrates the basic usage of the
Panasonic Grid-EYE sensor.
If you want to build the application you have to use the
--shield amg88xx_grid_eye_eval_shield shield designation accordingly when
you invoke west build.
When using the PAN1780 evaluation board the build invocation looks like this:
# From the root of the zephyr repository
west build -b pan1780_evb --shield amg88xx_grid_eye_eval_shield samples/sensor/amg88xx