CTHINGS.CO Connectivity Card
Overview
Connectivity Cards come with either M.2 or mPCIe form factor with various SoCs, enabling different radio interfaces.
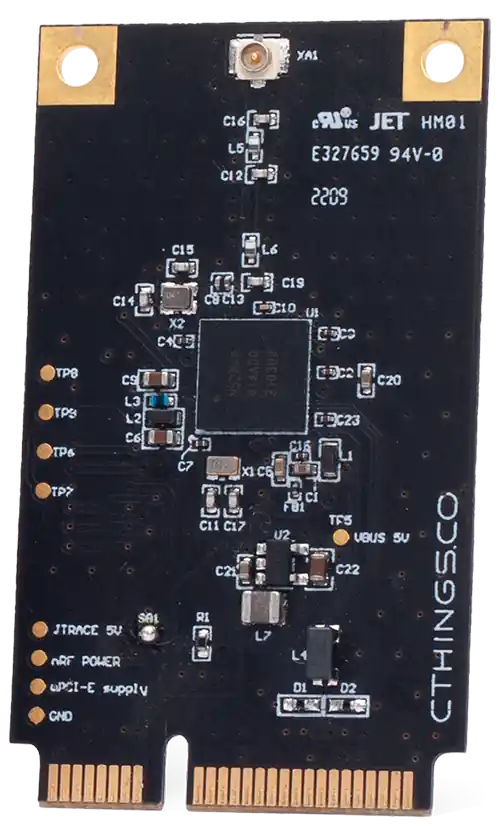
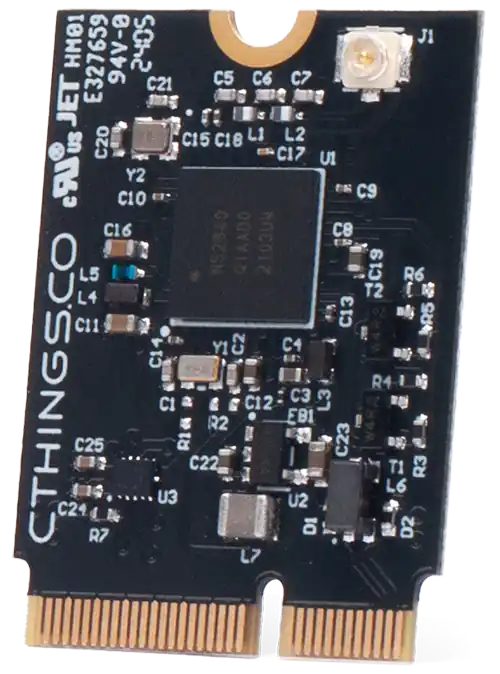
The Connectivity Card nRF52840 enables BLE and IEEE 802.15.4 over mPCIe or M.2 using USB device with on-board nRF52840 SoC
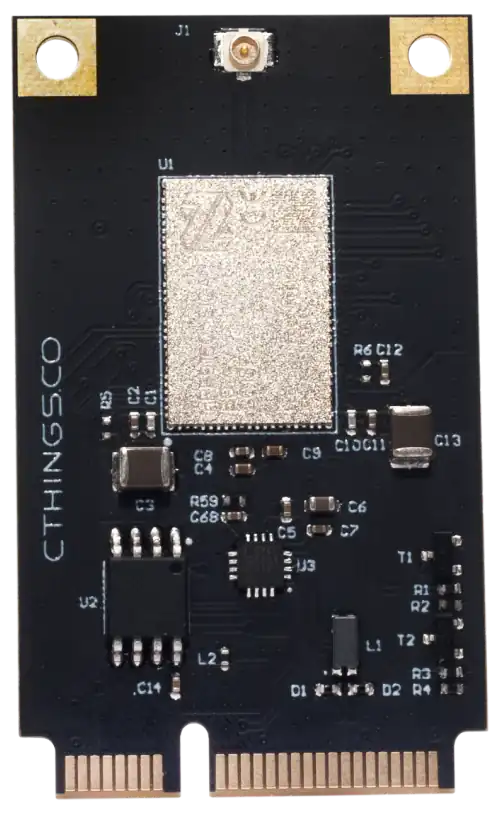
The Connectivity Card nRF9161 enables LTE-M/NB-IoT and DECT NR+ over mPCIe or M.2 using on-board USB-UART converter
Connectivity Card has following features:
CLOCK
FLASH
GPIO
MPU
NVIC
RADIO (Bluetooth Low Energy and 802.15.4) (only nRF52840)
RADIO (LTE-M/NB-IoT and DECT NR+) (only nRF9161)
RTC
USB (only nRF52840)
UARTE (only nRF9161)
WDT
More information about the board can be found at the Connectivity Cards Website [1] and for SoC information: Nordic Semiconductor Infocenter [2].
Hardware
The
ctcc/nrf52840board target has one external oscillator of the 32.768 kHz.The
ctcc/nrf9161board target has one external SPI NOR 64Mbit memory and one on-board USB-UART converter (CP210X).
Supported Features
The ctcc board supports the hardware features listed below.
- on-chip / on-board
- Feature integrated in the SoC / present on the board.
- 2 / 2
-
Number of instances that are enabled / disabled.
Click on the label to see the first instance of this feature in the board/SoC DTS files. -
vnd,foo -
Compatible string for the Devicetree binding matching the feature.
Click on the link to view the binding documentation.
ctcc/nrf52840 target
On-target memory for this board target: 256 KiB of RAM, 1 MiB of Flash.
Type |
Location |
Description |
Compatible |
|---|---|---|---|
CPU |
on-chip |
ARM Cortex-M4F CPU1 |
|
ADC |
on-chip |
Nordic Semiconductor nRF family SAADC node1 |
|
ARM architecture |
on-chip |
Nordic UICR (User Information Configuration Registers)1 |
|
on-chip |
Nordic EGU (Event Generator Unit)6 |
||
on-chip |
Nordic nRF family ACL (Access Control List)1 |
||
on-chip |
Nordic nRF family MWU (Memory Watch Unit)1 |
||
Audio |
on-chip |
Nordic PDM (Pulse Density Modulation interface)1 |
|
Clock control |
on-chip |
Nordic nRF clock control node1 |
|
on-chip |
Nordic nRF high-frequency crystal oscillator (nRF52 series)1 |
||
Comparator |
on-chip |
Nordic nRF COMP (analog COMParator)1 |
|
Counter |
on-chip |
Nordic nRF timer node5 |
|
Cryptographic accelerator |
on-chip |
Nordic ECB (AES electronic codebook mode encryption)1 |
|
on-chip |
Nordic nRF family CCM (AES CCM mode encryption)1 |
||
on-chip |
ARM TrustZone CryptoCell 3101 |
||
Debug |
on-chip |
ARMv7 instrumentation trace macrocell1 |
|
Flash controller |
on-chip |
Nordic NVMC (Non-Volatile Memory Controller)1 |
|
on-chip |
Properties defining the interface for the Nordic QSPI peripheral1 |
||
GPIO & Headers |
on-chip |
NRF5 GPIOTE1 |
|
on-chip |
|||
I2C |
on-chip |
Nordic nRF family TWIM (TWI master with EasyDMA)2 |
|
I2S |
on-chip |
Nordic I2S (Inter-IC sound interface)1 |
|
IEEE 802.15.4 |
on-chip |
Nordic nRF IEEE 802.15.4 node1 |
|
Interrupt controller |
on-chip |
ARMv7-M NVIC (Nested Vectored Interrupt Controller)1 |
|
LED |
on-board |
Group of GPIO-controlled LEDs1 |
|
Miscellaneous |
on-chip |
Nordic FICR (Factory Information Configuration Registers)1 |
|
on-chip |
Nordic nRF family PPI (Programmable Peripheral Interconnect)1 |
||
MTD |
on-chip |
Flash node1 |
|
Networking |
on-chip |
Nordic nRF family RADIO peripheral1 |
|
on-chip |
Nordic nRF family NFCT (Near Field Communication Tag)1 |
||
Pin control |
on-chip |
Nordic nRF family Pin Controller1 |
|
Power management |
on-chip |
Nordic nRF power control node1 |
|
PWM |
on-chip |
nRF PWM4 |
|
on-chip |
nRFx S/W PWM1 |
||
Regulator |
on-chip |
Nordic nRF5X regulator (fixed stage of the core supply)1 |
|
on-chip |
Nordic nRF52X regulator (high voltage stage of the main supply)1 |
||
Retained memory |
on-chip |
Nordic GPREGRET (General Purpose Register Retention) device2 |
|
RNG |
on-chip |
Nordic nRF family RNG (Random Number Generator)1 |
|
RTC |
on-chip |
Nordic nRF RTC (Real-Time Counter)3 |
|
Sensors |
on-chip |
Nordic nRF family TEMP node1 |
|
on-chip |
Nordic nRF quadrature decoder (QDEC) node1 |
||
Serial controller |
on-chip |
Nordic nRF family UARTE (UART with EasyDMA)2 |
|
SPI |
on-chip |
Nordic nRF family SPIM (SPI master with EasyDMA)4 |
|
SRAM |
on-chip |
Generic on-chip SRAM1 |
|
Timer |
on-chip |
ARMv7-M System Tick1 |
|
USB |
on-chip |
Nordic nRF52 USB device controller1 |
|
Watchdog |
on-chip |
Nordic nRF family WDT (Watchdog Timer)1 |
ctcc/nrf9161 target
On-target memory for this board target: 88 KiB of RAM, 1 MiB of Flash.
Type |
Location |
Description |
Compatible |
|---|---|---|---|
CPU |
on-chip |
ARM Cortex-M33F CPU1 |
|
ADC |
on-chip |
Nordic Semiconductor nRF family SAADC node1 |
|
ARM architecture |
on-chip |
Nordic EGU (Event Generator Unit)6 |
|
on-chip |
Nordic KMU (Key Management Unit)1 |
||
on-chip |
Nordic nRF family CTRL-AP (Control Access Port)1 |
||
on-chip |
Nordic SPU (System Protection Unit)1 |
||
on-chip |
Nordic UICR (User Information Configuration Registers)1 |
||
Audio |
on-chip |
Nordic PDM (Pulse Density Modulation interface)1 |
|
Clock control |
on-chip |
Nordic nRF clock control node1 |
|
Counter |
on-chip |
Nordic nRF timer node3 |
|
Cryptographic accelerator |
on-chip |
ARM TrustZone CryptoCell 3101 |
|
Flash controller |
on-chip |
Nordic NVMC (Non-Volatile Memory Controller)1 |
|
GPIO & Headers |
on-chip |
NRF5 GPIO1 |
|
on-chip |
|||
I2C |
on-chip |
Nordic nRF family TWIM (TWI master with EasyDMA)4 |
|
I2S |
on-chip |
Nordic I2S (Inter-IC sound interface)1 |
|
Interrupt controller |
on-chip |
ARMv8-M NVIC (Nested Vectored Interrupt Controller)1 |
|
IPC |
on-chip |
Nordic nRF family IPC (Interprocessor Communication)1 |
|
LED |
on-board |
Group of GPIO-controlled LEDs1 |
|
Miscellaneous |
on-chip |
Nordic DPPIC (Distributed Programmable Peripheral Interconnect Controller)1 |
|
on-chip |
Nordic FICR (Factory Information Configuration Registers)1 |
||
MMU / MPU |
on-chip |
ARMv8-M MPU (Memory Protection Unit)1 |
|
MTD |
on-board |
Properties supporting Zephyr spi-nor flash driver (over the Zephyr SPI API) control of serial flash memories using the standard M25P80-based command set1 |
|
on-chip |
Flash node1 |
||
on-chip |
Tags secure flash partitions in an ARM TrustZone-M layout on Nordic SoCs1 |
||
on-chip |
Tags non-secure flash partitions in an ARM TrustZone-M layout on Nordic SoCs1 |
||
Pin control |
on-chip |
Nordic nRF family Pin Controller1 |
|
Power management |
on-chip |
Nordic VMC (Volatile Memory Controller)1 |
|
on-chip |
Nordic nRF power control node1 |
||
PWM |
on-chip |
nRF PWM4 |
|
on-chip |
nRFx S/W PWM1 |
||
Regulator |
on-chip |
Nordic REGULATORS (voltage regulators control module) on nRF91X1 |
|
Retained memory |
on-chip |
Nordic GPREGRET (General Purpose Register Retention) device2 |
|
RTC |
on-chip |
Nordic nRF RTC (Real-Time Counter)2 |
|
Serial controller |
on-chip |
||
SPI |
on-chip |
||
SRAM |
on-chip |
Generic on-chip SRAM1 |
|
Timer |
on-chip |
ARMv8-M System Tick1 |
|
Watchdog |
on-chip |
Nordic nRF family WDT (Watchdog Timer)1 |
ctcc/nrf9161/ns target
On-target memory for this board target: 168 KiB of RAM, 1 MiB of Flash.
Type |
Location |
Description |
Compatible |
|---|---|---|---|
CPU |
on-chip |
ARM Cortex-M33F CPU1 |
|
ADC |
on-chip |
Nordic Semiconductor nRF family SAADC node1 |
|
ARM architecture |
on-chip |
Nordic EGU (Event Generator Unit)6 |
|
on-chip |
Nordic KMU (Key Management Unit)1 |
||
Audio |
on-chip |
Nordic PDM (Pulse Density Modulation interface)1 |
|
Clock control |
on-chip |
Nordic nRF clock control node1 |
|
Counter |
on-chip |
Nordic nRF timer node3 |
|
Flash controller |
on-chip |
Nordic NVMC (Non-Volatile Memory Controller)1 |
|
GPIO & Headers |
on-chip |
NRF5 GPIO1 |
|
on-chip |
NRF5 GPIOTE1 |
||
I2C |
on-chip |
Nordic nRF family TWIM (TWI master with EasyDMA)4 |
|
I2S |
on-chip |
Nordic I2S (Inter-IC sound interface)1 |
|
Interrupt controller |
on-chip |
ARMv8-M NVIC (Nested Vectored Interrupt Controller)1 |
|
IPC |
on-chip |
Nordic nRF family IPC (Interprocessor Communication)1 |
|
LED |
on-board |
Group of GPIO-controlled LEDs1 |
|
Miscellaneous |
on-chip |
Nordic DPPIC (Distributed Programmable Peripheral Interconnect Controller)1 |
|
MMU / MPU |
on-chip |
ARMv8-M MPU (Memory Protection Unit)1 |
|
MTD |
on-board |
Properties supporting Zephyr spi-nor flash driver (over the Zephyr SPI API) control of serial flash memories using the standard M25P80-based command set1 |
|
on-chip |
Flash node1 |
||
on-chip |
Tags secure flash partitions in an ARM TrustZone-M layout on Nordic SoCs1 |
||
on-chip |
Tags non-secure flash partitions in an ARM TrustZone-M layout on Nordic SoCs1 |
||
Pin control |
on-chip |
Nordic nRF family Pin Controller1 |
|
Power management |
on-chip |
Nordic VMC (Volatile Memory Controller)1 |
|
on-chip |
Nordic nRF power control node1 |
||
PWM |
on-chip |
nRF PWM4 |
|
on-chip |
nRFx S/W PWM1 |
||
Regulator |
on-chip |
Nordic REGULATORS (voltage regulators control module) on nRF91X1 |
|
Retained memory |
on-chip |
Nordic GPREGRET (General Purpose Register Retention) device2 |
|
RTC |
on-chip |
Nordic nRF RTC (Real-Time Counter)2 |
|
Serial controller |
on-chip |
||
SPI |
on-chip |
||
SRAM |
on-chip |
Generic on-chip SRAM1 |
|
Timer |
on-chip |
ARMv8-M System Tick1 |
|
Watchdog |
on-chip |
Nordic nRF family WDT (Watchdog Timer)1 |
Connections and IOs
LED
Note that boards do not have on-board LEDs, however they expose LED signals on mPCIe/M.2 pins.
nRF52840:
LED1 = P0.23
LED2 = P0.22
nRF9161:
LED1 = P0.11
LED2 = P0.12
Programming and Debugging
The ctcc board supports the runners and associated west commands listed below.
| flash | debug | attach | rtt | debugserver | |
|---|---|---|---|---|---|
| nrfjprog | ✅ | ||||
| nrfutil | ✅ (default) | ||||
| pyocd | ✅ | ✅ (default) | ✅ | ✅ | ✅ |
Applications for ctcc boards can be
built in the usual way (see Building an Application for more details).
Flashing
The board supports the following programming options:
Using an external debug probe
Below instructions are provided for ctcc/nrf52840, to use nrf9161 target, the USB device configs have
to be replaced with UART configurations.
Option 1: Using an External Debug Probe
Connectivity Card can be programmed using an external debug probe (Segger J-Link) by connecting to on-board SWD test pads.
For Segger J-Link debug probes, follow the instructions in the Nordic nRF5x Segger J-Link page to install and configure all the necessary software. Further information can be found in Flashing.
Then build and flash applications as usual (see Building an Application and Run an Application for more details).
Here is an example for the Console over USB CDC ACM application which prints out logs on emulated USB port.
# From the root of the zephyr repository
west build -b ctcc/nrf52840 samples/subsys/usb/console
west flash
Option 2: Using MCUboot with MCUmgr support
It is also possible to use the MCUboot bootloader with MCUmgr support to flash Zephyr applications.
Install a MCUmgr-compatible tool from supported list
and make sure MCUboot’s imgtool is available for signing your binary
for MCUboot as described on Signing Binaries.
Compile MCUboot as a Zephyr application with
MCUmgrsupport.To build the MCUboot:
west build -b ctcc/nrf52840 -d build/mcuboot mcuboot/boot/zephyr
To build the MCUboot:
west build -b ctcc/nrf9161 -d build/mcuboot mcuboot/boot/zephyr
Flash it onto the board as described in Option 1.
Flash other Zephyr application over USB using MCUmgr-compatible tool and reset target to boot into the image.
Build the blinky example with MCUboot support:
# From the root of the zephyr repository
west build -b ctcc/nrf52840 samples/basic/blinky -- -DCONFIG_BOOTLOADER_MCUBOOT=y -DCONFIG_MCUBOOT_SIGNATURE_KEY_FILE=\"path/to/mcuboot/boot/root-rsa-2048.pem\"
Build the blinky example with MCUboot support:
# From the root of the zephyr repository
west build -b ctcc/nrf9161 samples/basic/blinky -- -DCONFIG_BOOTLOADER_MCUBOOT=y -DCONFIG_MCUBOOT_SIGNATURE_KEY_FILE=\"path/to/mcuboot/boot/root-rsa-2048.pem\"
Note
In all examples it is assumed to use default root-rsa-2048.pem file from mcuboot/boot
directory. Providing certificate in build args produces signed binary automatically.
Do not use this certificate in your production firmware!
Debugging
These boards do not have an on-board J-Link debug IC, however instructions from the Nordic nRF5x Segger J-Link page also apply to them, with the additional step of connecting an external debugger.
To test flashed software, plug in ctcc card to mPCIe/M.2 slot or use mPCIe/M.2 adapter to USB and plug such adapter to USB port.
For
ctcc/nrf52840check on Linux system by enteringlsusbcommand if the following device appears:NordicSemiconductor MCUBOOTorNordicSemiconductor USB-DEV(when booted into blinky example).For
ctcc/nrf9161it’s not possible to see a change inlsusbdue to the on-board USB-UART converter. Instead, connect to the UART console using a terminal emulation program of your choice.