RZ/V2L SMARC Evaluation Board Kit
Overview
The Renesas RZ/V2L SMARC Evaluation Board Kit (RZ/V2L-EVKIT) consists of a SMARC v2.1 module board and a carrier board.
Device: RZ/V2L R9A07G054L23GBG
Cortex-A55 Dual, Cortex-M33
BGA551pin, 15mmSq body, 0.5mm pitch
SMARC v2.1 Module Board Functions
Carrier Board Functions
The FFC/FPC connector is mounted as standard for connection to high-speed serial interface for camera module.
The Micro-HDMI connector via DSI/HDMI conversion module is mounted as standard for connection to high-speed serial interface for digital video module.
The Micro-AB receptacle (ch0: USB2.0 OTG) and A receptacle (ch1: USB2.0 Host) are respectively mounted as standard for connection to USB interface.
The RJ45 connector is mounted as standard for software development and evaluation using Ethernet.
The audio codec is mounted as standard for advance development of audio system. The audio jack is implemented for connection to audio interface.
The CAN connector is implemented for connection to CAN-Bus interface.
The Micro-AB receptacles are implemented for connection to asynchronous serial port interface.
The microSD card slot and two sockets for PMOD are implemented as an interface for RZ/V2L peripheral functions.
For power supply, a mounted USB Type-C receptacle supports the USB PD standard.
MIPI Camera Module
MIPI Camera Module (MIPI CSI) is included. Image recognition processing can be used with images input with MIPI camera.
Hardware
The Renesas RZ/V2L MPU documentation can be found at RZ/V2L Group Website [1]
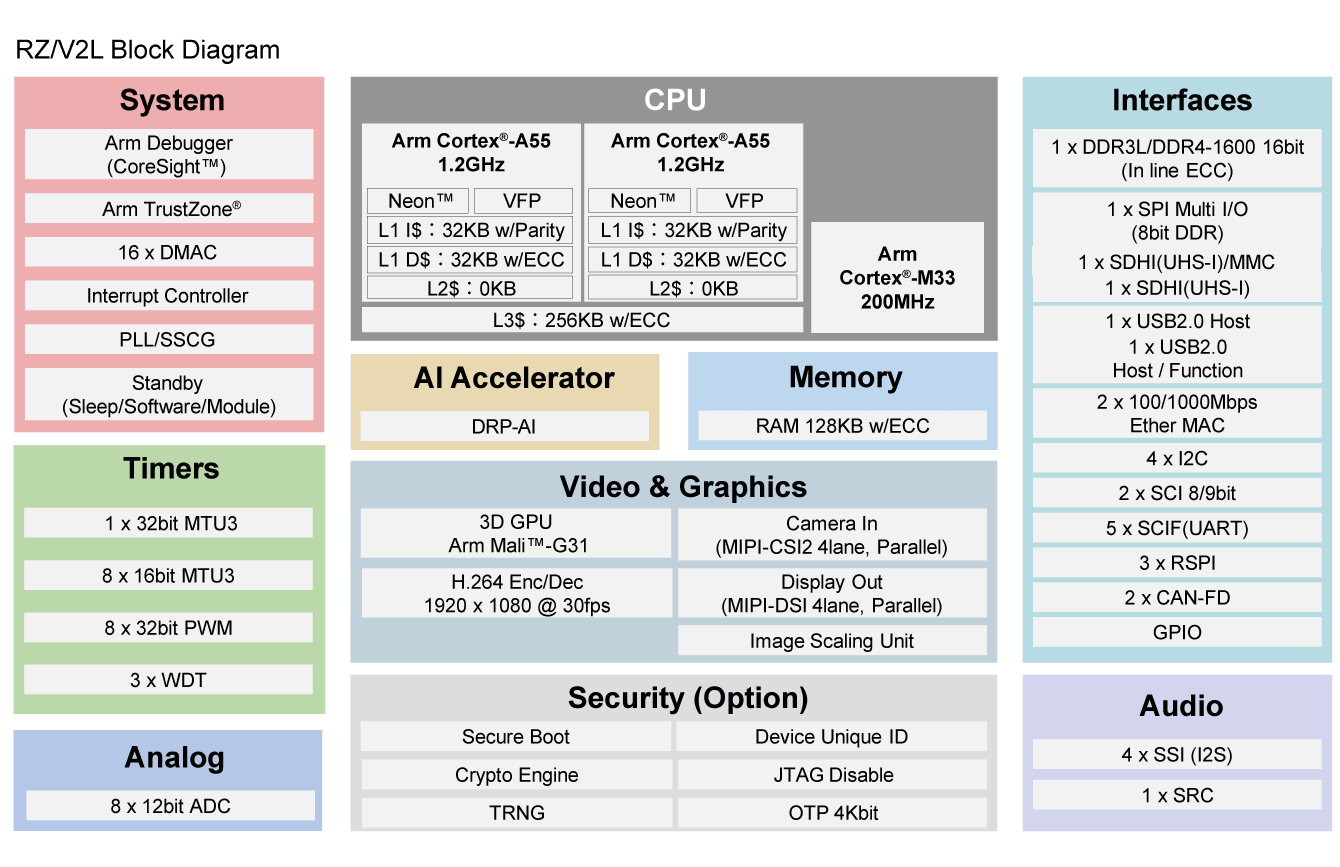
RZ/V2L block diagram (Credit: Renesas Electronics Corporation)
Detailed hardware features for the board can be found at RZV2L-EVKIT Website [2]
Multi-OS processing
The RZ/V2L-EVKIT allows different applications to be executed in RZ/V2L SoC. With its multi-core architecture, each core can operate independently to perform customized tasks or exchange data using the OpenAMP framework. Please see OpenAMP Linux Zephyr RPMsg sample for reference.
Supported Features
The rzv2l_smarc board supports the hardware features listed below.
- on-chip / on-board
- Feature integrated in the SoC / present on the board.
- 2 / 2
-
Number of instances that are enabled / disabled.
Click on the label to see the first instance of this feature in the board/SoC DTS files. -
vnd,foo -
Compatible string for the Devicetree binding matching the feature.
Click on the link to view the binding documentation.
rzv2l_smarc/r9a07g054l23gbg/cm33 target
On-target memory for this board target: 46 MiB of RAM, N/A of Flash.
Type |
Location |
Description |
Compatible |
|---|---|---|---|
CPU |
on-chip |
ARM Cortex-M33 CPU1 |
|
ADC |
on-chip |
Renesas RZ ADC-C driver1 |
|
Clock control |
on-chip |
Renesas RZ Clock Pulse Generator1 |
|
on-chip |
Generic fixed-rate clock provider21 |
||
Counter |
on-chip |
Renesas RZ GTM Counter3 |
|
DMA |
on-chip |
RZ DMA controller2 |
|
GPIO & Headers |
on-chip |
Renesas RZ GPIO common1 |
|
on-chip |
Renesas RZ GPIO controller49 |
||
I2C |
on-chip |
||
Interrupt controller |
on-chip |
ARMv8-M NVIC (Nested Vectored Interrupt Controller)1 |
|
on-chip |
Renesas RZ Interrupt Controller1 |
||
on-chip |
Renesas RZ external interrupt controller8 |
||
on-chip |
Renesas RZ GPIO interrupt (TINT) controller32 |
||
Mailbox |
on-chip |
Renesas MHU MBOX4 |
|
MMU / MPU |
on-chip |
ARMv8-M MPU (Memory Protection Unit)1 |
|
Pin control |
on-chip |
Renesas RZ/V pin controller1 |
|
PWM |
on-chip |
Renesas RZ GPT PWM8 |
|
Serial controller |
on-chip |
||
SPI |
on-chip |
||
SRAM |
on-board |
Generic on-chip SRAM1 |
|
Timer |
on-chip |
ARMv8-M System Tick1 |
|
on-chip |
Renesas RZ GPT8 |
||
on-chip |
Renesas RZ GTM Timer3 |
||
on-chip |
Renesas RZ OS timer3 |
Programming and Debugging
The rzv2l_smarc board supports the runners and associated west commands listed below.
| flash | debug | reset | rtt | attach | debugserver | |
|---|---|---|---|---|---|---|
| jlink | ✅ (default) | ✅ (default) | ✅ | ✅ | ✅ | ✅ |
Applications for the rzv2l_smarc board can be built in the usual way as
documented in Building an Application.
Console
The UART port for Cortex-M33 System Core can be accessed by connecting Pmod USBUART
to the upper side of PMOD 1.
Debugging
It is possible to load and execute a Zephyr application binary on
this board on the Cortex-M33 System Core from
the internal SRAM, using JLink debugger (J-Link Debug Host Tools).
Here is an example for building and debugging with the Hello World application.
# From the root of the zephyr repository
west build -b rzv2l_smarc/r9a07g054l23gbg/cm33 samples/hello_world
west debug
Flashing
RZ/V2L-EVKIT is designed to start different systems on different cores. It uses Yocto as the build system to build Linux system and boot loaders to run Zephyr on Cortex-M33 with u-boot. The minimal steps are described below.
Follow ‘’2.2 Building Images’’ of SMARC EVK of RZ/V2L Linux Start-up Guide [3] to prepare the build environment.
At step (4), follow step ‘’2. Download Multi-OS Package’’ and ‘’3. Add the layer for Multi-OS Package’’ of ‘’3.2 Integration of OpenAMP related stuff’’ of RZ/V2L Quick Start Guide for RZ/V Multi-OS Package [4] to add the layer for Multi-OS Package.
$ cd ~/rzv_vlp_<pkg ver>
$ unzip <Multi-OS Dir>/r01an7254ej0311-rzv-multi-os-pkg.zip
$ tar zxvf r01an7254ej0311-rzv-multi-os-pkg/meta-rz-features_multi-os_v3.1.1.tar.gz
$ cd build
$ bitbake-layers add-layer ../meta-rz-features/meta-rz-multi-os/meta-rzv2l
Start the build:
$ MACHINE=smarc-rzv2l bitbake core-image-minimal
The below necessary artifacts will be located in the build/tmp/deploy/images
Artifacts |
File name |
|---|---|
Boot loader |
bl2_bp-smarc-rzv2l_pmic.srec fip-smarc-rzv2l_pmic.srec |
Flash Writer |
Flash_Writer_SCIF_RZV2L_SMARC_PMIC_DDR4_2GB_1PCS.mot |
Follow ‘’4.2 Startup Procedure’’ of SMARC EVK of RZ/V2L Linux Start-up Guide [3] for power supply and board setting at SCIF download (SW11[1:4] = OFF, ON, OFF, ON) and (SW1[1:2] = ON, OFF)
Follow ‘’4.3 Download Flash Writer to RAM’’ of SMARC EVK of RZ/V2L Linux Start-up Guide [3] to download Flash Writer to RAM
Follow ‘’4.4 Write the Bootloader’’ of SMARC EVK of RZ/V2L Linux Start-up Guide [3] to write the boot loader to the target board by using Flash Writer.
Follow ‘’4.5 Change Back to Normal Boot Mode’’ with switch setting (SW11[1:4] = OFF, OFF, OFF, ON) and (SW1[1:2] = ON, OFF)
Follow ‘’3. Preparing the SD Card’’ of SMARC EVK of RZ/V2L Linux Start-up Guide [3] to write files to the microSD Card
Copy zephyr.bin file to microSD card
Follow “4.3.2 CM33 Sample Program Invocation with u-boot” from the beginning to step 4 of RZ/V2L Quick Start Guide for RZ/V Multi-OS Package [4]
Execute the commands stated below on the console to start zephyr application with CM33 core. Here, ‘’N’’ stands for the partition number in which you stored zephyr.bin file.
Hit any key to stop autoboot: 2
=> dcache off
=> mmc dev 1
=> fatload mmc 1:N 0x00010000 zephyr.bin
=> fatload mmc 1:N 0x40010000 zephyr.bin
=> cm33 start_normal 0x00010000 0x40010000
=> dcache on